
Game Console Power Supply Repair: Troubleshooting, DIY Fixes & Professional Services
If your game console suddenly refuses to power on or behaves erratically, the culprit often lies in the power supply unit (PSU). Understanding how to diagnose, repair, or when to seek professional help for console power supply issues can save you both time and money. Whether you're a gamer facing frustrating shutdowns, a DIY electronics enthusiast, or someone seeking reliable repair services, this comprehensive guide will walk you through everything you need to know about game console power supply repair in 2025.
Understanding Game Console Power Supplies
What is a Power Supply Unit (PSU) in Consoles?
A power supply unit in a gaming console converts AC (alternating current) from your home outlet into DC (direct current) voltage levels required by the console’s internal components. This Remove virus conversion is essential because electronic circuits inside the console operate on specific voltages and current regulated for stable performance. Some consoles feature external power bricks (like certain Xbox and Nintendo Switch models), while others have internal PSUs integrated onto the motherboard.
The PSU plays a crucial role — if it malfunctions, the console won’t receive proper power, causing startup failure, unexpected shutdowns, or even permanent hardware damage.
Common Console Power Supply Faults and Symptoms
Console power supply faults manifest through various symptoms, including:
- Console fails to power on at all
- Power indicator lights flicker or don’t illuminate
- Console unexpectedly turns off during gameplay
- Burning smell or visible scorch marks near the power port
- Intermittent powering issues or random restarts
- Overheating or excessive fan noise linked to PSU problems
These symptoms often indicate issues like blown fuses, damaged capacitors, faulty voltage regulators, or transformer failure within the PSU.
Key Components in Console Power Supplies (Capacitors, Transformers, Fuses, Diodes)
The PSU consists of several critical components that regulate and stabilize voltage:
- Capacitors: Store and smooth electrical energy; faulty capacitors cause unstable voltage and ripple.
- Transformers: Modify voltage levels and provide isolation from the mains supply.
- Fuses: Protect circuits by breaking the connection during overcurrent situations.
- Diodes: Ensure correct directionality of current flow, preventing backflow damaging components.
- Voltage Regulators: Maintain constant output voltage regardless of input fluctuations.
Understanding these components helps when troubleshooting or replacing parts during PSU repair.
Data recovery Cooper City
Diagnosing Power Supply Issues in Game Consoles
Tools Required for Diagnosis (Multimeter, Oscilloscope, Soldering Iron)
Effective diagnostics require precise tools to test and analyze the PSU:
- Multimeter: Measures voltage, resistance, and continuity to identify faulty circuits or components.
- Oscilloscope: Provides visual representation of voltage waveforms, useful for detecting ripple or noise.
- Soldering Iron and Desoldering Tools: Needed for removing and replacing damaged components on the circuit board.
- Test Leads and Probes: Assist in safely testing power rails and components.
- Thermal Camera (optional): Detects overheating spots signaling component failure.
Having the right equipment ensures thorough and safe troubleshooting.
Step-by-Step Troubleshooting Guide
This process narrows down the fault location efficiently.
How to Test and Identify Faulty Components (Capacitors, Fuses, Diodes)
- Capacitors: Use a multimeter with capacitance measurement or an ESR meter. Swollen tops or leakage confirm failure.
- Fuses: Test for zero resistance to confirm good status; infinite resistance means blown fuse.
- Diodes: Set multimeter to diode mode; forward voltage drop should be around 0.6-0.7V; reverse bias shows open circuit.
Table: Common Symptoms, Possible Causes, and Diagnostic Steps
DIY Game Console Power Supply Repair: Step-by-Step Instructions
Safety Precautions Before Repairing Your Console
Before opening your console:
- Unplug power supply to avoid electric shock.
- Discharge capacitors by waiting a few minutes after unplugging.
- Work in a static-free environment; use anti-static wrist strap.
- Use insulated tools to prevent short circuits.
- Follow manufacturer guidelines and warnings carefully.
Safety first prevents injury and further damage.

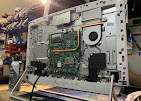
Opening the Console and Accessing the PSU
- Use appropriate screwdrivers to remove the console housing carefully.
- Locate the PSU—usually near the power inlet or separated as a power brick.
- Document cable connections before disconnecting for reassembly reference.
- Keep screws and small parts organized during disassembly.
Handle internal components delicately to avoid physical damage.
Replacing Components (Capacitor Replacement, Fuse Replacement, Transformer Repair)
- Capacitor Replacement: Desolder bad capacitor pins, insert new capacitors matching voltage and capacitance ratings, then solder securely.
- Fuse Replacement: Remove blown fuse and replace with exact rating type.
- Transformer Repair: Transformers typically require replacement due to complexity; source authentic replacements compatible with your console model.
Ensure all replacements conform to original specifications for safety and compatibility.
Soldering and Desoldering Techniques for PSU Repair
- Heat the solder joint with a soldering iron to melt solder.
- Use desoldering braid or a pump to remove old solder cleanly.
- Insert new component leads, heat the joint, and apply fresh solder to create a solid electrical connection.
- Avoid cold solder joints by ensuring the solder flows evenly and covers the pad and lead fully.
Proper technique ensures durability and electrical integrity.
Reassembly and Testing After Repair
- Reattach all cables and secure the power supply and casing.
- Plug in the console and power on to verify the fix.
- Monitor for normal startup behavior without flickering or shutdowns.
- Run a few test sessions to confirm stability.
If issues persist, reassess or consider professional repair options.
When to Seek Professional Game Console Power Supply Repair Services
Signs Your PSU Needs Expert Repair
- Complex component failures beyond your skill or equipment.
- Chronic or recurring power issues despite basic repairs.
- Visible damage to motherboard or power circuits requiring advanced diagnosis.
- Warranty considerations where DIY attempts might void coverage.
- Need for official replacement parts or technical support.
Professional help ensures reliability and preserves your console’s lifespan.

Types of Professional Repair Services (In-home, Mail-in, Pickup Repair)
- In-home Repair: Technician visits your location for convenience.
- Mail-in Repair: Send your console to specialist shops for thorough diagnostics and repair.
- Pickup Repair: Local repair shops offering quick dropoff and service.
Choose based on urgency, cost, and convenience preferences.
Repair Estimates, Quotes, and Warranty Considerations
Most reliable shops provide clear repair quotes after initial diagnostics. Ask about:
Phone repair shop Cooper City FL- Repair costs including parts and labor
- Turnaround times
- Warranty on repairs
- Whether original manufacturer parts are used
- Out-of-warranty service policies
Confirming these details helps avoid surprises.
Choosing a Reliable Repair Shop
Look for:
- Certified technicians experienced in game console PSU repair
- Positive customer reviews and testimonials
- Transparent pricing and communication
- Warranties or guarantees on repair work
- Availability of replacement parts for your specific console
Trustworthy service improves your chances for successful repair.
Preventative Maintenance and Tips to Avoid PSU Damage
Power Surge Protection and Use of Surge Protectors
Power surges from lightning strikes or electrical faults can instantly damage PSUs. Always use a quality surge protector designed for sensitive electronics. This simple step can prevent costly repairs caused by sudden voltage spikes.
Proper Handling and Cleaning of Power Supply Units
- Keep vents and ports free of dust using compressed air or soft brushes.
- Avoid exposing PSU to moisture or extreme temperatures.
- Handle power cords gently to prevent internal wire breaks.
- Regularly inspect cables and connectors for wear and tear.
Cleanliness and careful handling extend PSU service life.
Regular Console Maintenance to Prolong PSU Life
- Keep the console in a well-ventilated area to prevent overheating.
- Perform system updates to maintain firmware stability.
- Power down consoles properly rather than abrupt unplugging.
- Address early signs of trouble promptly to avoid cascading damage.
Routine care reduces the frequency of PSU-related failures.
In summary, mastering game console power supply repair involves understanding the PSU’s function, accurately diagnosing faults, applying safe DIY fixes, and recognizing when professional intervention is warranted. With the right tools, knowledge, and preventative measures like surge protection and regular maintenance, you can keep your gaming setup powered reliably for countless hours. Whether you choose to tackle repairs yourself or entrust experts, investing in timely PSU care safeguards your gaming experience and prolongs your console’s life. Ready to bring your console back to life? Start troubleshooting today or connect with a trusted repair specialist for expert service!
